Office Word 2013发布文章到WordPress

转载自:http://junan.name/2305.html

最近喜欢上用Word发布文章到Wordpress,因为有时候在WEB发布文章的时候突然网络出现异常,提交不了文章,最后导致文章丢失,需要重新写过文章,此时,没劲写了!而使用Word发布,即使网络出现异常,本地也有存档,待网络正常时候再发布也即可。上月安装了Office 2013,感觉还是挺清爽的,并且通过Skype拨打英国微软注册了Office 2013。

042613_0315_OfficeWord21

下面就详细介绍通过Office Word 2013发布文章到Wordpress:

1.由于Wordpress3.5以后的版本XML-RPC是默认开启的,所以之前3.5版本的就需要启动XML-RPC。

2.打开Office Word ,新建一个Word文档。点击 文件——共享——发布至博客042613_0315_OfficeWord22

3.点击 立即注册

042613_0315_OfficeWord23

4. 选择博客源码,Wordpress

042613_0315_OfficeWord24

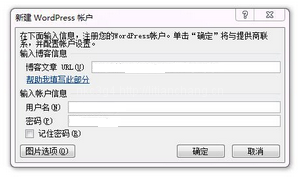
5.输入 博客地址以及账号密码

042613_0315_OfficeWord25

6.至此,已完成同步到Wordpress的功能

042613_0315_OfficeWord26

7.最后就是在Word里编写文章,最后点击发布即可!

042613_0315_OfficeWord27

^_^ !

CentOS /usr/lib/libstdc++.so.6: version `GLIBCXX_3.4.15' not found

出现该错误的原因是当前的GCC版本中,没有GLIBCXX_3.4.15,需要安装更高版本。

我们可以输入:strings /usr/lib/libstdc++.so.6 grep GLIBCXX,查看当前的GCC版本,结果如下:

GLIBCXX_3.4 GLIBCXX_3.4.1 GLIBCXX_3.4.2 GLIBCXX_3.4.3 GLIBCXX_3.4.4 GLIBCXX_3.4.5 GLIBCXX_3.4.6 GLIBCXX_3.4.7 GLIBCXX_3.4.8 GLIBCXX_3.4.9 GLIBCXX_3.4.10 GLIBCXX_3.4.11 GLIBCXX_3.4.12 GLIBCXX_3.4.13 GLIBC_2.0 GLIBC_2.3 GLIBC_2.4 GLIBC_2.1 GLIBC_2.1.3 GLIBC_2.3.2 GLIBC_2.2 GLIBCXX_FORCE_NEW GLIBCXX_DEBUG_MESSAGE_LENGTH

可见没有GLIBCXX_3.4.15.

下载新版本,地址:http://ftp.de.debian.org/debian/pool/main/g/gcc-4.7/libstdc++6\_4.7.2-5\_i386.deb

假设下载的文件放在Download/。

解压:ar -x libstdc++6_4.7.2-5_i386.deb && tar xvf data.tar.gz

解压后出现Download/usr目录;

1)cd Download/usr/lib/i386-linux-gun

  1. su root

  2. cp libstdc++.so.6.0.17 /usr/lib

  3. cd /usr/lib

  4. rm libstdc++.so.6

  5. ln libstdc++.so.6.0.17 libstdc++.so.6重新建立软连接

这时,我们再输入:strings /usr/lib/libstdc++.so.6 grep GLIBCXX,结果为:

GLIBCXX_3.4 GLIBCXX_3.4.1 GLIBCXX_3.4.2 GLIBCXX_3.4.3 GLIBCXX_3.4.4 GLIBCXX_3.4.5 GLIBCXX_3.4.6 GLIBCXX_3.4.7 GLIBCXX_3.4.8 GLIBCXX_3.4.9 GLIBCXX_3.4.10 GLIBCXX_3.4.11 GLIBCXX_3.4.12 GLIBCXX_3.4.13 GLIBCXX_3.4.14 GLIBCXX_3.4.15 GLIBCXX_3.4.16 GLIBCXX_3.4.17 GLIBCXX_DEBUG_MESSAGE_LENGTH

看,GLIBCXX_3.4.15已经有了! 转载自:http://www.cnblogs.com/yingsi/p/3290958.html

nginx+php 出现404错误

装好 nginx-1.0.5 与 php-5.3.6(php-fpm) 迫不及待的测试 info.php(),但是只返回了空白页,什么也没有输出,以下是错误日志。

192.168.6.82 - - [01/Aug/2011:13:54:20 +0800] “GET /info.php HTTP/1.1” 404 5 “-“ “Mozilla/5.0 (X11; U; Linux x86_64; zh-CN; rv:1.9.2.9) Gecko/20100827 Red Hat/3.6.9-2.el6 Firefox/3.6.9” 192.168.6.82 - - [01/Aug/2011:14:57:30 +0800] “HEAD /info.php HTTP/1.1” 404 0 “-“ “curl/7.19.7(x86_64-redhat-linux-gnu) libcurl/7.19.7 NSS/3.12.6.2 zlib/1.2.3 libidn/1.18 libssh2/1.2.2” 192.168.6.82 - - [01/Aug/2011:13:58:57 +0800] “GET /index.html HTTP/1.1” 200 151 “-“ “Mozilla/5.0(X11; U; Linux x86_64; zh-CN; rv:1.9.2.9) Gecko/20100827 Red Hat/3.6.9-2.el6 Firefox/3.6.9”

在nginx.conf配置文档

location ~ \.php$ { fastcgi_pass   127.0.0.1:9000; fastcgi_index  index.php; fastcgi_param  SCRIPT_FILENAME  /scripts$fastcgi_script_name; include        fastcgi_params; }

更改为

location ~ \.php$ { root           /data/web; fastcgi_pass   127.0.0.1:9000; fastcgi_index  index.php; fastcgi_param  SCRIPT_FILENAME /data/web$fastcgi_script_name; include        fastcgi_params; }

转载自:http://dngood.blog.51cto.com/446195/628699

MySQL修改root密码的多种方法

方法1: 用SET PASSWORD命令

mysql -u root

mysql> SET PASSWORD FOR ‘root‘@’localhost’ = PASSWORD(‘newpass’);

方法2:用mysqladmin

mysqladmin -u root password “newpass”

如果root已经设置过密码,采用如下方法

mysqladmin -u root password oldpass “newpass”

方法3: 用UPDATE直接编辑user表

mysql -u root

mysql> use mysql;

mysql> UPDATE user SET Password = PASSWORD(‘newpass’) WHERE user = ‘root’;

mysql> FLUSH PRIVILEGES;

在丢失root密码的时候,可以这样

mysqld_safe –skip-grant-tables&

mysql -u root mysql

mysql> UPDATE user SET password=PASSWORD(“new password”) WHERE user=’root’;

mysql> FLUSH PRIVILEGES;

 转载自:http://www.57cto.com/thread-650-1-4.html

./configure: error: the HTTP gzip module requires the zlib library.

./configure: error: the HTTP gzip module requires the zlib library.You can either disable the module by using –without-http_gzip_moduleoption, or install the zlib library into the system, or build the zlib librarystatically from the source with nginx by using –with-zlib= option.

则需要安装“zlib-devel”即可。SSH执行以下命令: yum install -y zlib-devel